Follow Me!

Monday, January 27, 2014

No Velcro, No Problem!.... or is it?

Well Ya'll! I'm at it again. You all know I sometimes get these crazy ideas in my head on easier and sometimes bizarre ways to achieve certain looks without the typical products. Hey, what can I say, I'm creative.

I love experimenting with different types of curlers and creating all kinds of curls in different ways. Whether it's tight spiral curls or big sexy curls, I'm up for it. Shoot, I would even try an 80's style perm if I thought I could make it look cute. One thing I have a hard time achieving is a big voluminous curl that is usually made with large velcro rollers. There are a couple of reasons it's not the easiest for me. 1. Is because it is so time consuming for someone who likes to sleep in the morning.(You have to section it, curl it with a curling iron, roll it, then wait.) and 2. I don't have a good set of velcro rollers. Not that I cant afford them but I honestly always find a way to talk myself out of buying them when I see them.  So one day, I thought "hmmmm...what if I made something that I could sleep on so that it cuts back on time in the morning AND I already have it in my house?" SO get ready for this ya'll because I really have no clue if it's going to work! If it does... great! If not... well, that's why they invented ponytails, right? Let's continue, I've decided that if I just take a few of my spiral curling rods and tape them together, I can make a larger curl. Makes sense to me.

 So let's get started shall we?

Materials I used:
  • Lots of spiral curling rods (like the ones here)
  • Spray bottle with 3/4 water and 1/4 conditioner
  • a roll of tape
  • hairbrush
Well let's start with the rollers themselves.
Get about 4 or 5 rods and put them together. (you can use more or less depending in the curl size you'd like)

Take a strip of tape and tape the rods in the center.

Make a few of these bundles. Depending on how thick your hair is, you may need at least 10. I used 9 bundles in my hair. Two on the top, two on each side and three in the back.

Start sectioning off large pieces of your hair and clip any hair that needs to be secured. 
I began with the sides. I took 4 inch sections of my hair, sprayed it with a mist of water and I brushed it straight upwards. Then I took a 'bundle roller' and rolled my hair bending the bundles on the ends to secure.
Oh yeah! I know you're loving this look.
Then I went to the back and repeated the steps. I made sure that each section was pulled upwards and not out. In my head I feel like this will give me the lift that velcro rollers give to add volume... we will see, I guess.

Check out that Messy Vanity ya'll! Ugh, It's a mess!

Finish up with the top section. Start from the back and work your way forward. 
When you're all done, It's time to stand back and take a look at the beauty you've created.
OoooWee! This is gonna be hard to sleep in. But maybe not. Maybe It will be more comfortable since there's more
cushioning from the numerous rollers.


Now... we wait.

What do you think guys? Is this gonna work?
Only time will tell... See ya in the morning!


I'm not gonna lie, the night was rough. I woke up around 2:30am and decided that I needed to at least loosen the side bundles. When I loosened them I noticed my idea was, in fact, working. I went back to sleep pretty excited. 

Here are the results: 
While removing the bundles...

After working my fingers through...

Overall, I'm pretty happy with the results. Not too shabby for a made up invention. I got the curl and volume I was hoping for and although my process could be tweaked a bit, I think this could be something I do often. It cut tons of time off of my morning process. 

Yes. I know. I'm a genius. (Just kidding) ;)

I hope you like this look. Let me know what you think. 

Thanks for stopping by The Messy Vanity,
Kat


Thursday, January 23, 2014

How to Apply Makeup in 10 Easy Steps

Click the photo to enlarge
So often I get asked to teach people how to apply makeup. I try to explain how simple your basic makeup application can be. It can be easy and quick enough to work into your morning routine. I have specifically left product names out of this blog post because I want this to be a straight up "How to". I've left the photos in basic black and white for the same reason. Knowing how to apply makeup is something every girls should learn to do. Whether you wear it everyday or for special occasions learning the basics is key I've broken this down into 10 steps to make it easy for teens, tweens and women (or men) of all ages . Enjoy.

A good primer can help to fill in any pores or scars you have as well as help to keep your makeup on all day.
Foundations can come is full, medium or sheer coverage. Depending on your skin type, you will need to choose the coverage that works for you. Make sure the the shade is closest to your complexion. Picking the wrong color can really ruin your entire look.
Contouring & highlighting can be optional but is beneficial if you'd like to add dimension and depth to your face.
Applying makeup without some sort of color on your cheeks is pointless. Whether its bronze, coral or pink, if you don't want to look washed out, blush is a must.
Trust me, you will thank me later. Shaping and filling your brows can really frame your face. It evens out any scars or bald spots and gives your face a finished look.
Shadow doesn't have to be anything fancy or intricate. It can give your eyes an awakened look. Using a little or alot is up to you.
Define your lids... your top ones at least.
Mascara is key in having a finished look. Don't believe me? Try applying mascara to just one. Notice how the eye with mascara looks more alive. Without mascara, you could still look like you just rolled out of bed no matter how much makeup you put on.
In my opinion, lip liner is also an optional step, HOWEVER, liner can act like a primer to keep your lipstick on longer. It can be blended with a gloss for sheer color and it can act as a barrier for your lipstick so that it stays on your lips and doesn't bleed into the cracks.
Lipstick or gloss pulls the whole look together.


Below is a diagram on product placement


Thanks for stopping by The Messy Vanity. I hope you found this guide helpful.


Saturday, January 18, 2014

Valentine's Day Date Night Look

The season of love is right around the corner. Soon there will be bouquets of roses, boxes of chocolates and pink and red hearts all over the place. Love will be in the air and you all will be asking yourselves the age old question "Who will be my Valentine?". But that will be the least of your worries... once you find that special someone, the real stress begins. What will you you wear? Where will you go? Will your hair be perfect? What about your makeup? There a million things to think about. Scratch that hair and makeup question off of your list. I've created the perfect date night look using the Too Faced a Few Of My Favorite Things palette. This look is soft and feminine and adds just the right amount of sexy. You can deepen it by building your colors for a sultry mysterious look. You are in charge here. You decide... Are you gonna be soft and sexy or sultry and mysterious? Valentine's Day only comes around once a year and you can't go wrong with this look.

Use the diagram below for product placement


 Let's Begin

For The Eyes


  • Start by priming your lid from lashline to brow
  • Apply NYX Milk from lashline to crease

  • Apply #1 Cream Colored Ponies all over lid to brow


Use this diagram for placement
  • With a fluffy brush, apply #6 Chocolate Milk to crease
  • Apply #7 Soiree in the lower area of your crease about 3/4 way across your lid
 

  • Use a flat shadow brush to pack #2 Coquet all over the lid from the lash line to Soiree
  • Apply #8 Dark Chocolate to the outer edge of your lashline and gradually blend into the creaseline
  • Use #9 Melt Into Spring to apply to the upper crease just below the browbone
  • Dab #3 Taffy to the center of the lid
  • Brush #5 Whiskers on Kittens to the browbone
  • Apply #4 Snowflakes to the inner tear duct area of your lid and smudge onto the lower lashline
  • Smudge #8 Dark Chocolate & #7 Soiree onto the outer lower lashline
  • Line the top lid with Sephora Long Lasting Eyeliner in Black and wing out at the ends 
  • Apply Estee Lauder Sumptuous mascara to the lashes after curling
  • Fill in and shape brows
  • Pair with a Mauve shade lipstick for a soft look or a bold Burgundy lipstick for a sultry look
This look can obviously be adapted using palettes and shades you have in your collection

 For the hair

  • I used 15- 1in. sponge rollers and rolled my hair the night before
  • I sprayed each strand with Healthy Sexy Hair Soy Tri-Wheat Leave In Conditioner with a quick mist before rolling
  • Sleep on it
  • Take the rollers out in the morning and brush (alot) until you get your desired curl. The more you brush the more you can sculpt the curl to your liking
  • Pin back on one side and your look is complete

I hope you enjoyed this tutorial! What are your plans for Valentine's Day? 

Thank you for stopping by The Messy Vanity,
Kat

Wednesday, January 15, 2014

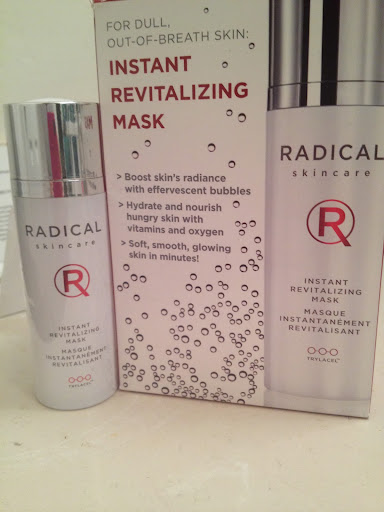
Radical indeed

Instant Revitalizing Mask
For weeks I've been dying to tell you all about the most "radical" product I've been fortunate enough to have the opportunity to review. It's the Instant Revitalizing Mask by Radical Skincare. 
It was created by two sisters who have made it their mission to create the perfect skincare products to capture your youth. 

I decided that this could not be a product that I could review after just one use. To get an accurate assessment, I needed to use this consistently for at least a few weeks. I did just that and I've got to say, I would love to use this product forever! I truly love the way it makes my skin feel. Throughout my use, I would share my experiences with my friends and found that each time I explained what it did to my skin and how it felt, I got giddy. It was exciting to share my thoughts on the product with them. To talk about it really made me happy. I know it sounds crazy that someone could get so excited about a facial product but it's true. You have to try it for yourself. 
Let me just walk you through my routine and reactions. 
  • The bottle itself is classy and sleek looking. But the coolest part about it is how it opens! It's not your average pump or screw top. It's a little bit of both PLUS because of the way it opens, it's a no mess pump. You can really tell that they put real thought into the design. 
  • All you need is a dime sized amount on your fingers. You will notice the mask formula is a pretty light goldish looking color with a pearly finish. 
  • Instantly you will notice the smell. It's a light citrusy scent that immediately awakens your senses. 
  • This part is the fun part, applying it. You apply it all over your face. Like magic it goes from a silky liquid to a foaming cleanser and instantly you begin to notice a gentle tingling feeling all over your face. My first reaction was to just smile. It was a pleasant feeling. 
  • The directions say leave it on for 3-5 minutes but even before your first 3 minutes are up, you begin to feel a million tiny bubbles popping all over your face. It's tickly and yet gives you the feeling that this stuff is really working. 
  • Once the bubbles finish popping, it's time to rinse. Splash your face with water to rinse all of it off and you will notice it rinses clean and leaves your face feeling cool and refreshed. 
  • The finishing touch is the Radical Youth  Infusion Serum. Wow! It leaves your face feeling silk smooth and soft. You will soon notice your skin is polished and brighter. 
Overall I am thrilled... More than thrilled that I tried this product and hope that I am able to work this into my budget after finishing the bottle.
Thank you. Thank you. Thank you Radical Skincare for giving me this opportunity. 

Things you need to know: 
  • You can get this product at RadicalSkincare.com or Barney's
  • It's made with ingredients you are familiar with such as Acai Berry, Grape Seed Extract and Coffee Berry (just to name a few)
  • It helps to regenerate your skin and defend it against harsh day to day elements 
  • It cost $65 and in my opinion, it's worth every penny
  • You should use it twice a week for maximum results
  • To describe this product in one word... Would it be corny if I say RADICAL? Because that pretty much sums it up. 

I really hope you enjoyed this review and get a chance to use this product. You won't be sorry. 

Thank you for stopping by The Messy Vanity, 
Kat


It was a this very moment I realized that I look like the poster child for "I don't do mornings". 
Striking resemblance don't you think. Haha. 

*TMV reviews are my honest opinions on products. I have not been paid to review this product. 

New bag from @shoedazzle. Shaped like a bowling/dr. Bag. Has pretty much no room inside but hey, who doesn't want to downsize a bit, right? Lol 

Monday, January 6, 2014

Get 3 FREE Zoya Nail Polishes!


  1. Type Zoya.com into your browser.
  2. Choose 3 or more nail polishes from the amazing selection that Zoya has. ( I chose Farah, Katherine & Dahlia)
  3. Enter COLOR2014 at check out.*
  4. Pay processing and handling fee.
  5. Wait for your polishes to get to your house.
  6. Enjoy!
*offer expires 11:59pm on January 13, 2014

Let me know what you think on The Messy Vanity!

Thanks for stopping by,
Kat


Sunday, January 5, 2014

These are a few of my favorite things....

I realize, it's been quite a while since I've done one of these segments and I think it's about that time.
So often I get questions about which mascara do I think is best, which liner do I use most, what do I use on my hair? And a lot of the time I can't just pick one. In my opinion, the products I use on any given day are based on the look I'm trying to achieve. For instance, I see all of these blog posts about makeup brushes and what each brush is for and although the purpose of each brush is a good start, I hardly ever use a brush solely for what it's supposed to be for. Some days a lip brush can be just a lip brush but it can also be a great tool for packing loose pigment shades onto smaller areas of you lids to add a pop of color or create dimension. At other times a large fluffy crease brush can be used to contour the sides of your nose. An angled brow brush can create a crisp line when using gel liner. I'm getting a bit off topic but the point is, it's all about the look you are going for and the easiest way for you to achieve that look. You get the point. So back to my favorite things. 

I've put together a few things that I use regularly and seem to be my "go to" products since I've purchased them. These are products that I find myself reaching for "just in case". Products that I think "Ok if this look doesn't work, I could always just use ______ and it will all pull together". Some of them are just products that I use everyday no matter what look I'm trying to create and some of them are products I've listed a number of times before. 

So now that I've rambled, gotten off topic and gotten back on, let's get started.
  1. Revlon Colorstay Liquid Foundation - I've used it everyday since my first purchase and have repurchased several times since then. THIS STUFF REALLY WORKS PEOPLE! It stays put all day and has medium coverage. 
  2. e.l.f. Cosmetics Essential Foundation Brush - I've always been a sponge or finger applicator type of girl but my curiosity about using a foundation brush really got to me one day and after purchasing this brush, my sponge using days were over. 
  3. e.l.f. Studio Countouring Blush and Bronzing Powder in St. Lucia -  I use this everyday. The blush is a beautiful shade and the bronzer is perfect for contouring. I think it's safe to say I've repurchased this one at least 5 times. 
  4. Milani Brow Fix Kit - Not only is this kit great for filling in brows, but it also provides a perfect taupe shade for adding dimension to your crease or you can use the same shade as a transition color when applying eyeshadow. The highlight shade is perfect for brow bone and adding shimmer to the inner corners of your eye. The kit also comes with a mini brow brush, sponge tip shadow applicator and mini tweezers for brow shaping on the go. 
  5. Lorac Pro Palette - You've seen and heard me talk about this one time and time again since I got it. It's the most versatile palette I think I've ever tried. Day looks, night looks, glam looks, etc. This palette pretty much can do it all. It has a nice variety of matte and shimmer and the palette itself is thin and compact which makes it easy to travel with. Also, a little goes a long way. If you are looking for a versatile palette that's a reasonable price, it's this one! Highly, highly, highly recommend. 
  6. Lorac Front of the Line Pro Liner - Again, another great product from Lorac. I purchased this one the same day and am pleasantly pleased. I've used this liner just about everyday. Whether I'm creating a thin or thick line, this liner glides on easily and smooth. 
  7. CoverGirl Professional Super Thick Lash Mascara - I kind of bought this mascara on a whim when my other favorite mascara was discontinued. It was only $5.99 and all I can say is WOW. I am so surprised by how well this mascara works. It separates my lashes and thickens them with no flaking throughout the day. I'm definitely going to purchase this again. 
  8. Mirabella Colour Sheers Lipstick in Daydream - I couldn't find the link to the exact shade but the formula for this is great. The shade itself, DayDream, is a perfect mauve. For olive toned skin like mine, I tend to lean towards the mauvey type shades for everyday looks. I received this one in one of my Ipsy bags and have used it ever since. 
  9. Loreal Multi-Restorative Dry Oil - I use just a few spritzes after I wash my hair. Brush it through and it leaves my hair soft and shiny all day long. This is another product that a little goes a long way. My hair feels healthier and more bouncy when I use this. 
  10. Big Sexy Hair Volumizing Blow Dry Gel - Another great product that I  received in my one of Ipsy bags. I love the way it adds volume and texture to my hair which makes it so much easier to style. I've repurchased this product since I received the sample in my bag and will continue to purchase it. If you're looking for that extra oomph in your hair routine, give this product a try. 
Well y'all, that's all for this segment of These Are a Few of My Favorite Things. I hope you all have a chance to try some of the products listed and let me know what you think. Good or bad, I'd love to hear your thoughts. Leave your comments in the area below or post your thoughts on The Messy Vanity Facebook Page

Thanks for stopping by The Messy Vanity and hope you come back soon! 

Kat